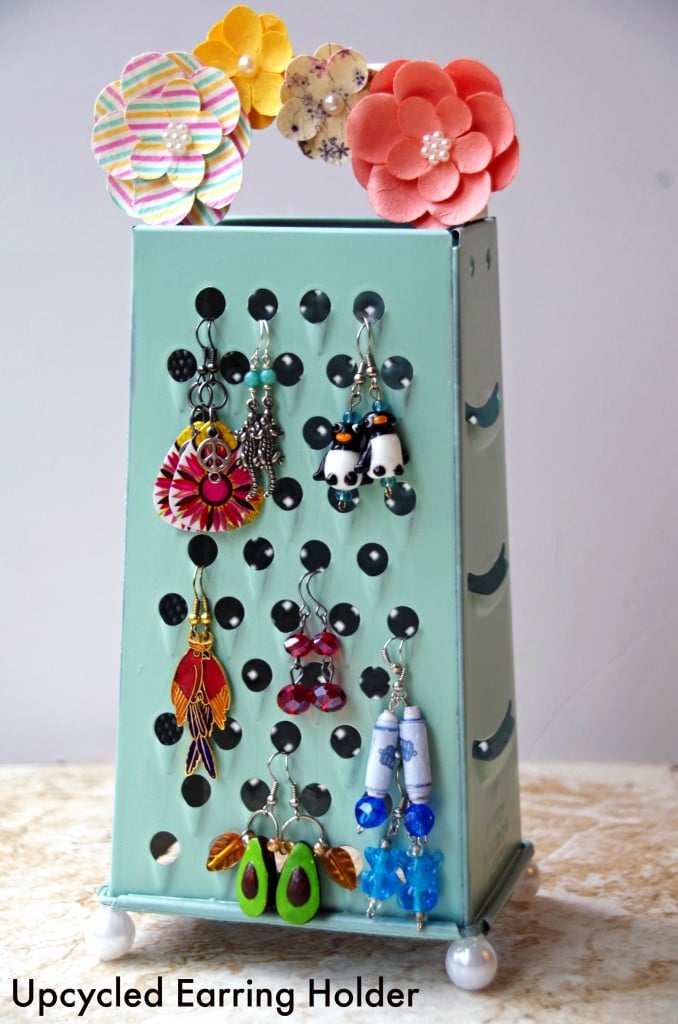
This homemade earring holder is perfect for dangling earrings that need to be better cared for. If you love upcycling projects and decluttering, use an old box cheese grater to organize jewelry!
Posts feature partner companies & may be sponsored. Post contains affiliate links & I will be compensated if you make a purchase after clicking on links. As an Amazon Associate I earn from qualifying purchases.
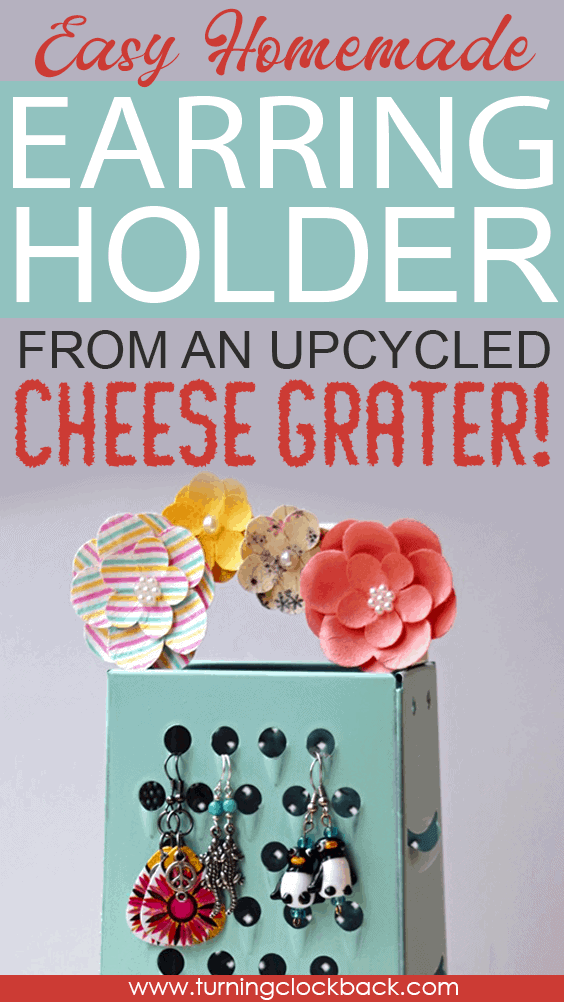
Table of Contents
Upcycling Old Box Cheese Graters
My daughter loves earrings and the older she gets, the more she wants to wear the dangly variety. However, they can get damaged if left in the jewelry box and often get tangled up with the rest of the jewelry in there.
I came across a creative upcycled craft idea on Pinterest that used an old cheese grater to create a beautiful homemade earring holder.
While I was out and about at the thrift store, I found a cheese grater for only a couple of dollars. Woohoo! I decided to get crafty. Other than the cheese grater, the only things you really need are paint and whatever decorations you want to use to spruce it up a bit.
Here is how I turned that old cheese grater into a very pretty homemade earring holder! Of course, choose your favorite colors and patterns for this project!
✯Don’t want to miss the next post?✯
Follow Turning the Clock Back on Facebook | Twitter | Pinterest
Or join the private Facebook group for simple tips on going green!
Homemade Earring Holder Supplies:
You won’t need much for this upcycled craft project. An old box cheese grater and some paint are the bare minimum. In addition, add embellishments like fabric flowers and some small white beads for the feet and you are done!
- 1 metal 4 sided cheese grater
- newspaper
- spray paint
- acrylic paint/paintbrushes (if desired for the handle to be a different color)
- 4 large beads for ‘feet’
- embellishments like cute flower embellishments, gems, etc for decorating (also optional but pretty)
- Hot glue gun

INSTRUCTIONS:
Step one: Paint the body of your cheese grater. I used an all-purpose type of spray paint and used several light coats for full coverage. Do this outside and set down some newspaper to protect the driveway/grass/patio, etc. Let each coat dry before applying the next.
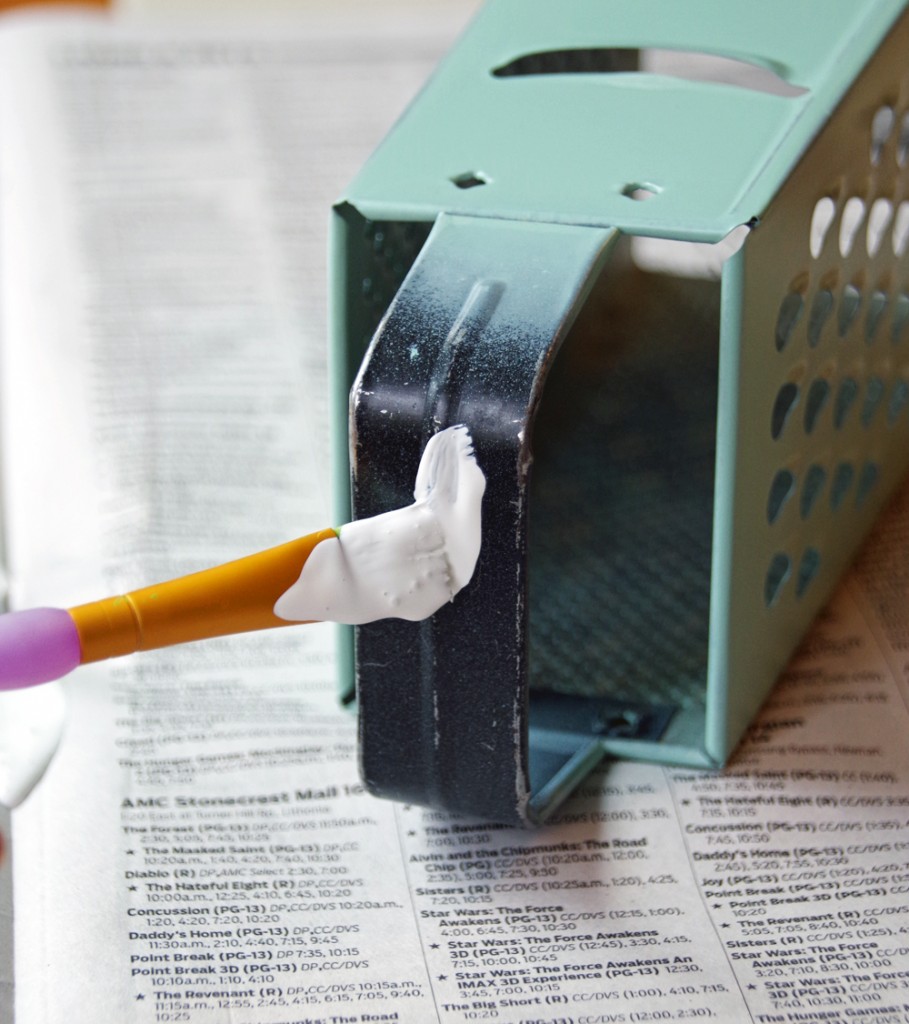
Step two: Paint the handle with acrylic paint if you want it to be a different color than the body. Do as many coats as needed to hide the metal and let the paint dry between coats.
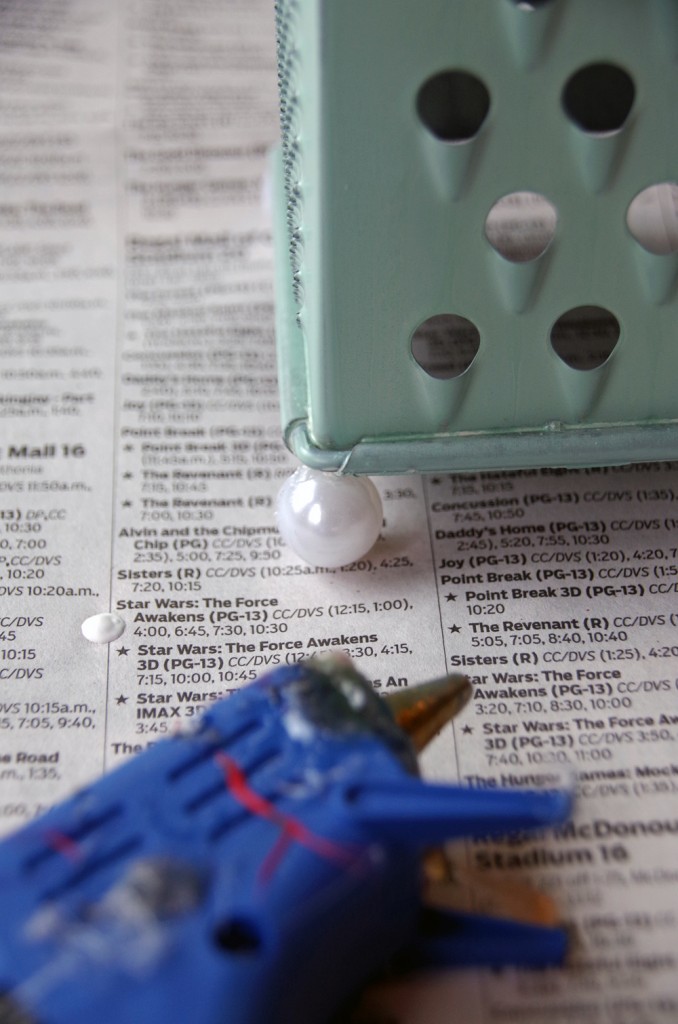
Step three: Apply the feet. Put a tiny dab of hot glue on a large bead and press to the bottom corner of the cheese grater. Repeat on all 4 sides.
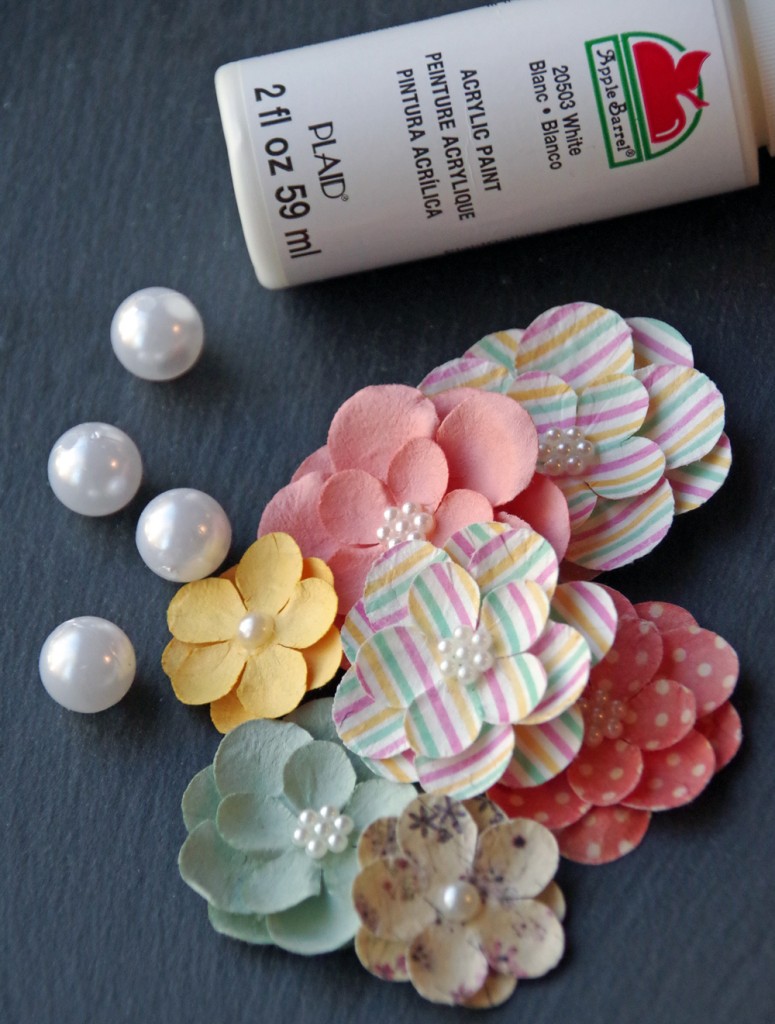
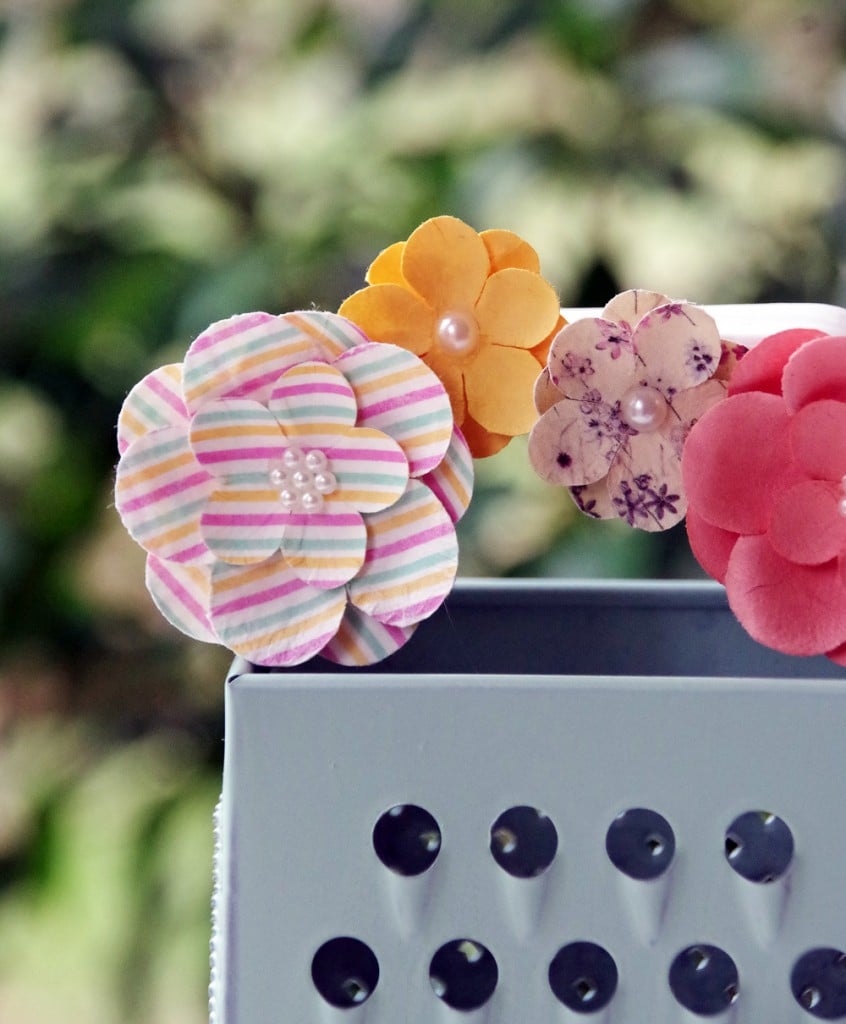
Apply the embellishments: Apply whatever types of embellishments you want on your homemade earring holder. Try some paper flowers but you can get as creative as you want. However, make sure you put them on with strong glue so they don’t fall off.
Hang up your earrings: Once everything on your homemade earring holder is dry, just put your earrings in it! Totally easy, right? And you can customize it for your own personal decor tastes. An upcycled craft idea that only costs pennies and serves a useful purpose! How do YOU store your dangly earrings?
More Upcycled Craft Ideas
Looking for more upcycled crafts? Here are a few you might want to try!
- How to Cut a Glass Bottle in Half with String This is a great tutorial for cutting wine bottles in half for crafts.
- DIY Upcycled Cookie Sheet Memo Board Make your own magnetic memo board out of an old cookie sheet.
- Juice Can Lids Pumpkin Craft Save those lids from juice concentrate containers and make this upcycled pumpkin craft.
How to upcycle cheese graters into a DIY earring holder
For those who love to upcycle, this DIY earring holder is perfect for dangling jewelry that needs better care. It’s the perfect solution for people who love upcycling projects and decluttering.
Easy Homemade Earring Holder from an Upcycled Cheese Grater!
This homemade earring holder is perfect for dangling earrings that need to be better cared for. If you love upcycling projects and decluttering, use an old box cheese grater to organize jewelry!
Materials
- 1 metal 4 sided cheese grater
- newspaper
- spray paint
- acrylic paint/paint brushes (if desired for handle to be a different color)
- 4 large beads for ‘feet’
- embellishments like cute flower embellishments, gems, etc for decorating (also optional but pretty)
Tools
- Hot glue gun
- paint brushes
Instructions
- Paint the body of your cheese grater. I used an all purpose type spray paint and used several light coats for full coverage. Do this outside and set down some newspaper to protect the driveway/grass/patio, etc. Let each coat dry before applying the next.
- Paint the handle with acrylic paint if you want it to be a different color than the body. Do as many coats as needed to hide the metal and let the paint dry between coats.
- Apply the feet. Put a tiny dab of hot glue on a large bead and press to the bottom corner of the cheese grater. Repeat on all 4 sides.
- Apply whatever types of embellishments you want on your homemade earring holder. Try some paper flowers but you can get as creative as you want. However, make sure you put them on with a strong glue so they don’t fall off.
- Once everything on your homemade earring holder is dry, just put your earrings in it! Totally easy, right? And you can customize it for your own personal decor tastes. An upcycled craft idea that only costs pennies and serves a useful purpose!

Diane is a professional blogger and nationally certified pharmacy technician at Good Pill Pharmacy. She earned her BS in Microbiology at the University of New Hampshire and has worked in cancer research, academics, and biotechnology. Concern over the growing incidence of human disease and the birth of her children led her to begin living a more natural life. She quickly realized that the information she was learning along the way could be beneficial to many others and started blogging and freelance writing to share this knowledge with others. Learn more about her HERE.
Oh this is so pretty. I’ve been thinking about making one of these for over two years, but now we have cats so maybe that’s not the best idea. 🙂
cats would definitely enjoy the dangly bits!
This is a genius idea, it’s kind of kitshy but it’s also unsuspecting. I had to do a double take- and I LOVE the colors you’ve gone with! I don’t wear earrings, but I bet my niece would love this!
I love this idea! It’s so useful, reuses something that may otherwise get tossed AND it looks cute too. I’m pinning it!
That is totally cute. What a wonderful idea and a great way to use something old to make something new.
Is the black spot painted on or hot glue and painted to protect earrings?
The black spots are the holes in the cheese grater!